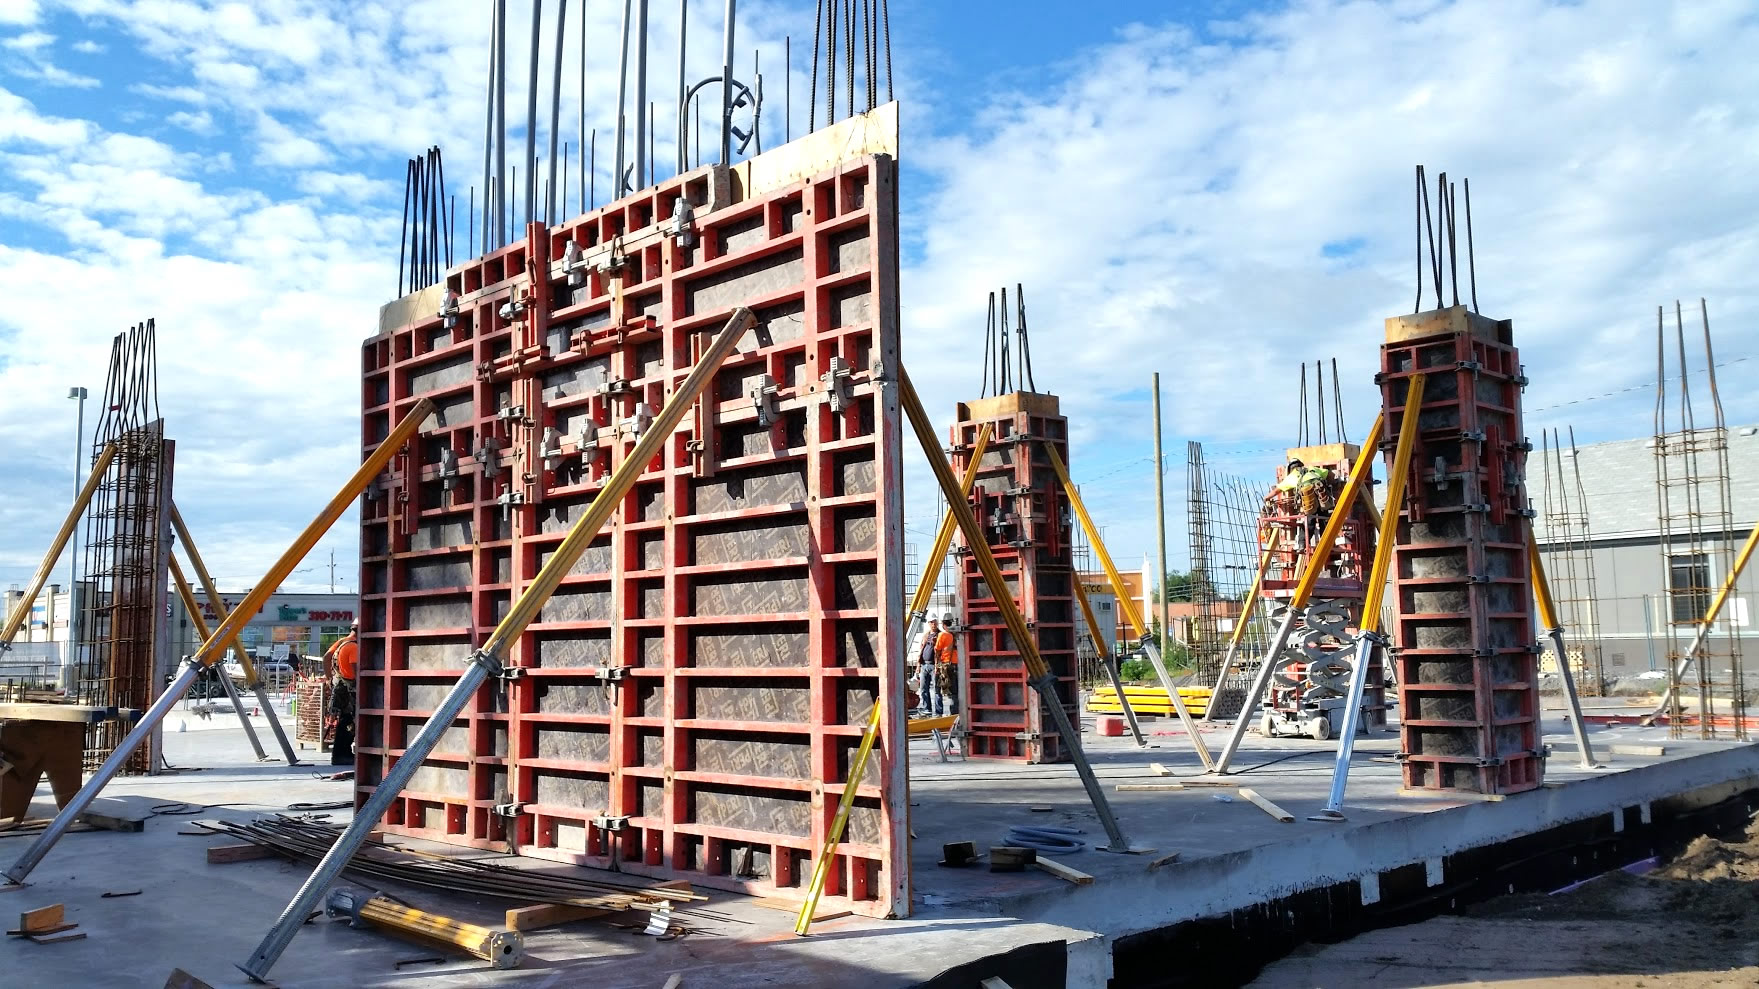
Concrete is one of the most versatile and widely used materials in construction around the world, offering strength, durability, and adaptability. However, the same four simple ingredients in a mix design can produce a 2,000 psi concrete just as well as a 6,000 psi concrete; it all depends on the proportions used in the mix.
Designing the right concrete mix is essential to meet performance and durability requirements while keeping the costs at a minimum. To assist with this task, the American Concrete Institute (ACI) provides a design methodology in the Standard Practice for Selecting Proportions for Normal, Heavyweight, and Mass Concrete (ACI 211.1-91) document. The procedure can be executed in a total of eight (8) steps to establish a concrete mix design tailored to requirements, material parameters and conditions. While these steps aren’t complex, the complete method is long and can be repetitive, which may increase the chance of errors. It is also easy to miss some smaller details or corrections when starting to get comfortable with the process.
This blog simplifies the methodology, making it more accessible. It also includes a downloadable Excel calculator at the bottom of the blog for quick and accurate mix designs, following the presented standard practice.
Parameter Requirements
Before getting started, make sure to have the following parameters and requirements available. The calculator provided comes with a default set of parameters along with some notes for each input in case you are not sure about certain values.
- The required concrete compressive strength (psi or MPa);
- The coarse aggregates (gravel) nominal maximum size (in or mm);
- The coarse aggregates unit weight (lb/ft3 or kg/m3);
- The fine aggregates (sand) fineness modulus;
- The cement density (lb/ft3 or kg/m3);
- The coarse aggregates shape (well-shaped angular or rounded);
- The apparent specific gravity of coarse and fine aggregates;
- The absorption of coarse and fine aggregates;
- The moisture content of coarse and fine aggregates (may be 0 for dry);
- The air content requirement of the concrete;
- The level of exposure of the concrete;
- Strength data from previous samples of the mix, if available.
Typical values for these parameters are available in the Excel spreadsheet at the end of this blog.
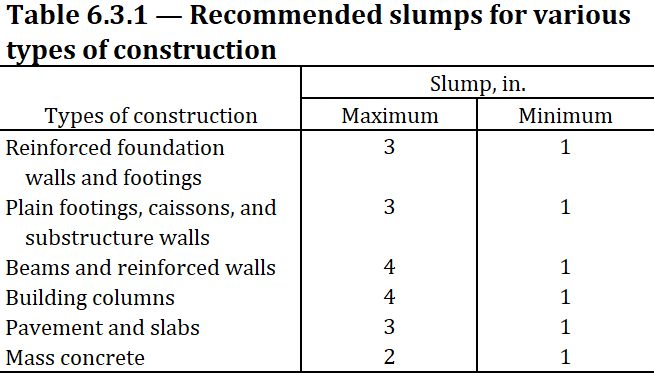
Step 1: Select a Slump Value for Your Mix Design
The first step in designing our mix is to select an appropriate slump value, which is a measure of the concrete’s workability and consistency. The slump value should align with the intended use of the concrete. Recommended slump ranges for various types of construction are provided in Table 6.3.1 from ACI211.1-91 below, but these values may be adjusted based on the method of consolidation used.
Step 2: Select a Maximum Coarse Aggregate Size
In this step, we will select an appropriate maximum coarse aggregate size for the concrete mix. Larger aggregates generally enhance performance and should be prioritized when feasible and economical. However, specific limitations must be considered based on the dimensions and design of the structure.
The maximum coarse aggregate size should not exceed any of the following dimensions:
- ⅕ of the narrowest dimension between sides of forms;
- ⅓ of the depth of slabs;
- ¾ of the minimum clear spacing between reinforcing steel.
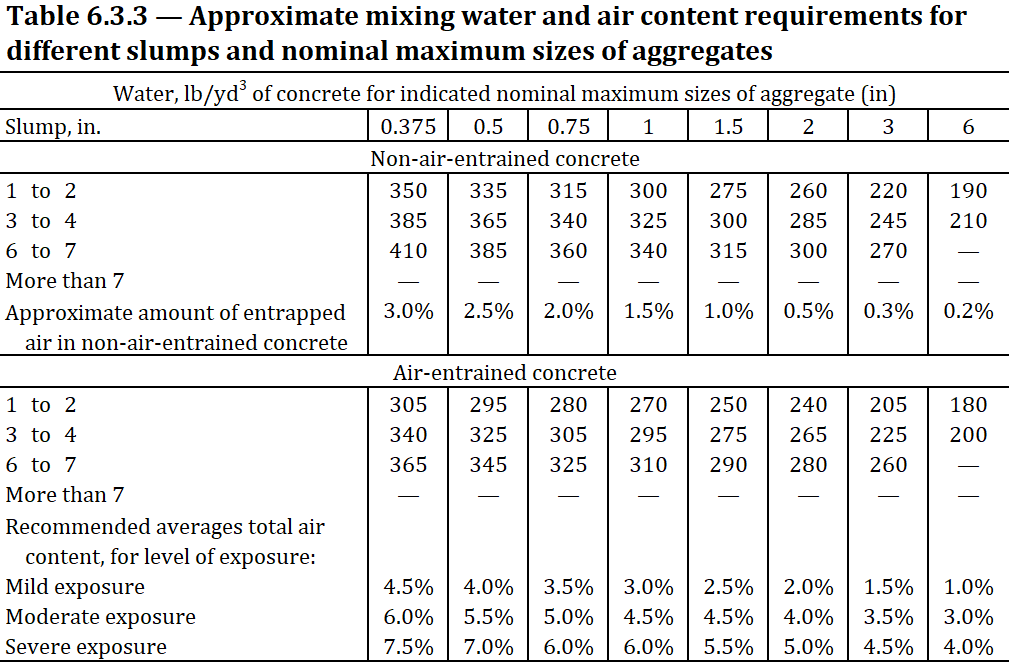
Step 3: Select Water and Air Content
The next step is to select the water and air content to use in the mix design. This is based on the slump and the nominal maximum size of aggregates previously selected, as seen in Table 6.3.3 from ACI211.1-91 below. Naturally, the results differ considerably based on whether the concrete is to be air-entrained. If our selected slump or aggregate size values are not directly presented in the table, we can default to the greatest water and air content in adjacent values, which are associated with smaller aggregates and greater slump. Then, if the coarse aggregates are rounded (as opposed to well-shaped angular), we should decrease the water content by 25 lb/yd3 for air-entrained concrete or 30 lb/yd3 for non-air-entrained concrete.
Step 4: Water-Cement Ratio Determination
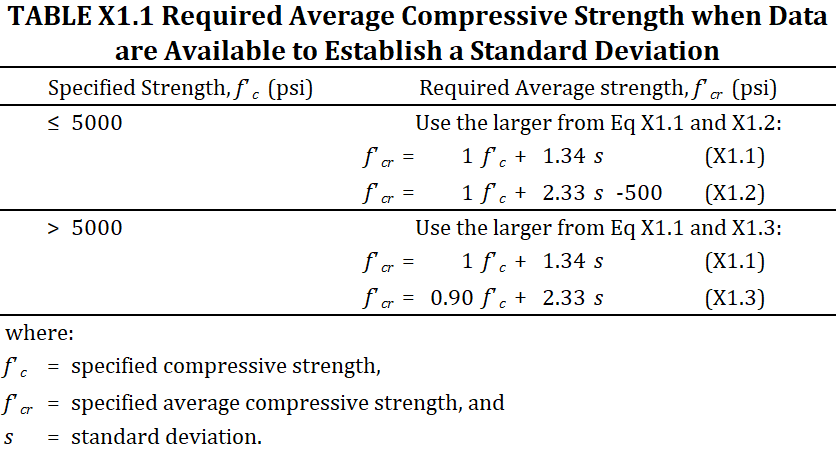
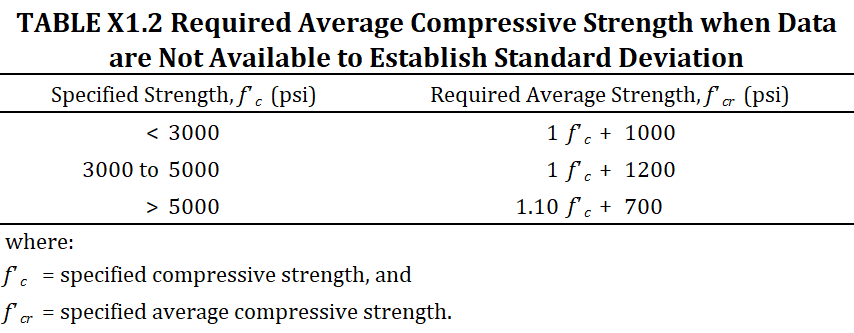
The next step in the process is the determination of the water to cement ratio, which is based mainly on the strength requirement at 28 days for the mix design. However, ACI specifies that the average strength selection must consider a sufficient margin above the requirement to account for low tests. While ACI 214 and ACI 318 are specified for this effect, we will here use a correction from ASTM which allows us to limit the number of low tests below 1%. This correction depends on if sample tests are available for the mix. If less than 15 samples with
strength measurements at 28 days are available, we use the equations in ASTM C94/C94M Table X1.2 directly. Otherwise, the correction can consider the equations in ASTM C94/C94M Table X1.1 when data is available, which typically offers a smaller margin. For this table, the strength standard deviation of the available samples is used, with a linear adjustment if less than 30 samples are available. The adjustment is a factor of 1.16 applied to the standard deviation for 15 samples, and a factor of 1.0 for 30 samples, with linear interpolation between these two points.
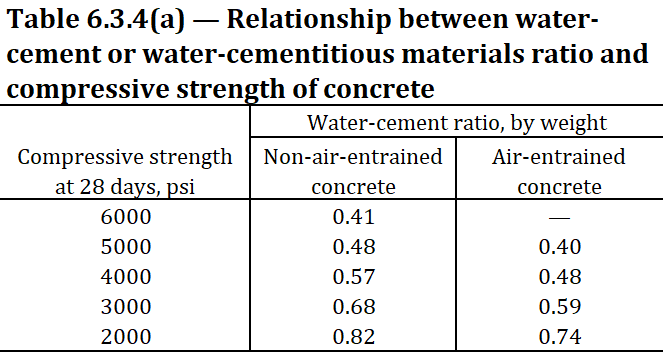
Once the specified strength of the concrete is determined, ACI 211.1-91 Table 6.3.4(a) is used to interpolate the required water to cement ratio in the mix, which is also dependent on whether the concrete is air-entrained.
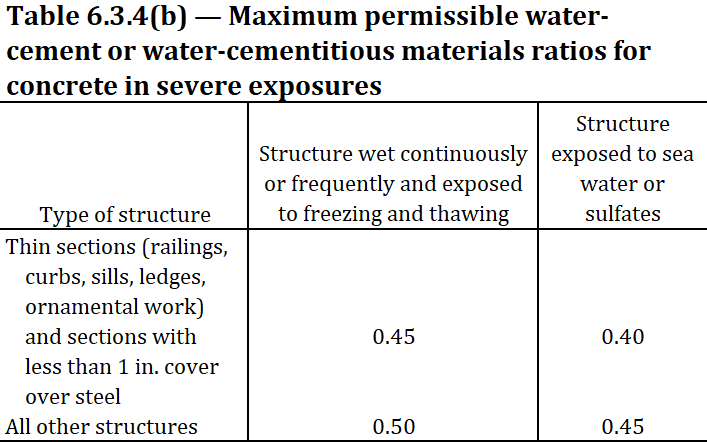
With the water to cement ratio interpolated, we should compare with some thresholds in ACI 211.1-91 Table 6.3.4(b) for severe exposure conditions.
Step 5: Determine Your Cement Content to Perfect Your Mix Design
Once we have the water to cement ratio from Step 4 and the water content from Step 3, we can determine the amount of cement by dividing the water content by the water to cement ratio.
Step 6: Now, Your Coarse Aggregate Content
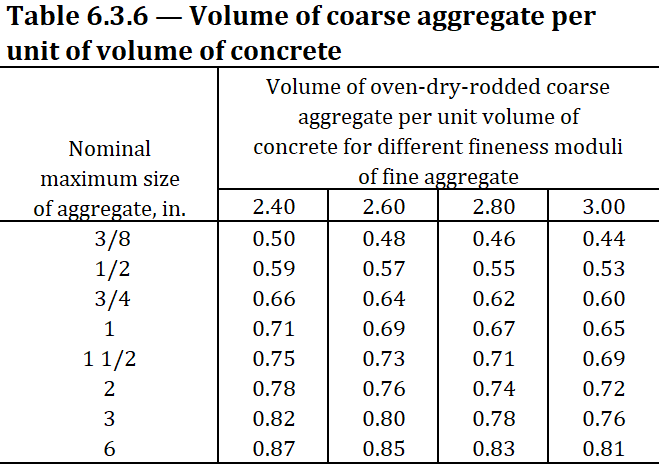
The next step is to get a measure of the coarse aggregate content through ACI 211.1-91 Table 6.3.6. This provides a volume ratio of coarse aggregate to concrete based on the size of the coarse aggregates and the fineness moduli of the fine aggregates. This value can be multiplied by the coarse aggregate unit weight to get a measure of the proportion required in the mix.
Step 7: Get your Fine Aggregates Proportion
At this stage, all but one component has a specified proportion: the fine aggregates. For this method, the fine aggregates content is calculated as the remaining weight or volume unused by other components in the mix. Out of the two alternatives, the volume calculation is considered more exact, since the expected weight of the concrete is an estimation to begin with. To obtain the fine aggregate content with precision, the first step of the approach is to calculate the volume displaced by the known components, which include water, air, cement and coarse aggregates. Then, for a standard design volume (typically 1 yd3), these volumes are subtracted to determine the required volume of fine aggregates. Note that careful considerations are required to adjust for aggregate’s absorption and water content, which is covered in depth in Step 8.
Step 8:
In this final step, the calculated proportions of aggregates must be adjusted to account for the moisture present in the materials. Aggregates in the field are rarely dry and typically contain both absorbed water within the particles and free moisture on their surface. These moisture levels affect to the overall water content of the mix and must be carefully considered to maintain the intended water-cement ratio.
Since the previously obtained aggregate proportions would be for dry aggregates, then these values must be increased based on the moisture content of the in-place aggregates. On the other hand, the mixing water must also be adjusted based on the moisture content and the absorption in the aggregates. Essentially, it should be assumed that the aggregates will absorb free water to their absorption capacity while releasing any excess free moisture into the mix.
Concrete mix design is a fundamental process that ensures the strength, durability, and cost-effectiveness of a project. By following the ACI 211.1-91 standard practice, we can systematically determine the optimal proportions of each ingredient to achieve the desired performance. While the step-by-step method may seem complex, breaking it down into clear stages—from selecting slump value to adjusting for moisture content—makes it manageable and precise.
To simplify the process further, using the provided Excel calculator can save time and reduce errors, ensuring accurate mix designs tailored to specific project requirements. Whether you’re an experienced engineer or new to concrete mix design, leveraging these systematic guidelines will help you create strong and reliable concrete with confidence.
Download Concrete Mix-Design Calculator (Metric)
Giatec Concrete Mix Design Calculator – Metric
Download Concrete Mix Design Calculator (Imperial)
Giatec Concrete Mix Design Calculator – Imperial
Conclusion
By mastering mix design, you not only optimize material usage but also contribute to the long-term success and sustainability of construction projects. So, take the time to get the mix right—because the foundation of any great structure starts with well-designed concrete.
Continue learning about how to better your mix design with Understanding Concrete Packing Models: The Key to Better Mix Design